Atlas

Monday, November 28, 2011

Celtic Crafting

As promised, after taking a day to be thankful, I am back with our Irish inspired crafts. As I mentioned in my last Irish post, my parents recently visited Ireland and brought us back a book of Irish crafts and activities. In the book there was a bit about The Book of Kells and it showed some lovely letters that were inspired by the ancient writings. Then there was a section that said, "Write your name the celtic way".. it seems like a weird way to say it, but it was kind of a fun idea none the less. So, we decided to go ahead and write our names the celtic way. Some letters are not in the gaelic alphabet, so we had to wing it with a few, and others were shockingly different from how we write the letter, more on that shortly. 

I happened to have some card stock hanging around, so I figured that would be perfect to use as place cards for our upcoming Irish Dinner. I used a pencil and drew the outline for each letter and gave the kids each a marker and told them to fill in the lines.


I know what you are thinking right now. That I misspelled my husband's name and instead of Preston I wrote Prerton, but in the gaelic text, the lowercase "s" looks like a lowercase "r". If you look closely you can see that the real lowercase "r" actually does look different than the "r" that is actually an "s". I did consider altering it to look like an "s" that we would use, but it felt inauthentic and ultimately, I couldn't think of a good reason to change it, it's not like he wouldn't know which seat was his and he'd be stuck sitting in another room because his place card appears to be spelled differently. (See the Gaelic Alphabet here.)

You'll never guess what we did next. Well, if you've read any of my other posts, then you might guess. We used Sculpey. Seriously, Sculpey should be sponsoring my blog with the amount of mention they get, but they do not, nor do they probably care about these silly projects that I am doing with my littles. Anyway, when we started our tour of Ireland, I swore that we would not do any shamrocks, this is not St. Patrick's Day after all. However, as it turns out, shamrocks kept turning up and then I learned that the shamrock is the national plant of Ireland. Even though shamrocks are pretty cliché, I conceded and agreed to a few shamrocks (I drew the line at leprechauns).  We found a nice green color Sculpey on sale and decided to make table decorations to be scattered on the table for our dinner. In addition to shamrocks, I made a celtic knot and Aiden made a celtic high cross.  


Completing the craft part of our learning always makes the end feel near. We usually do our crafts as we approach our celebration dinner and after we have had some time to research a bit, this way we can be inspired by our learnings when we create our crafts. The end of our Irish tour is drawing near, but we still have to stamp our passports (see the making of the passports here and other stamps here) and eat some Irish food before we can move on to another destination. 

Coming Soon: A giveaway, a potato stamp, and a hearty dinner that only the Irish could create.


Thursday, November 24, 2011

Giving Thanks


Just a quick note of Thanks. 
We hope that you enjoy your Thanksgiving, and that you find something to be thankful for today and everyday. 

See you on Monday with a post about an Irish craft project!


Monday, November 21, 2011

Flying the Irish Tricolor

After completing the passports and potato stamps, then having an Egyptian Birthday Party, we are ready to take on a new country. This month, we are learning about The Emerald Isle. Ireland is one of those places that every single photo makes it look like somewhere you ought to be, so it wasn't hard for us to decide to put Ireland on the list of places that we want to "visit" on our not so traveled tour of the world. 

Making the construction paper flag is always the first step, so I armed the littles for the task. 

Aiden ready to go with scissors and Eliana ready with the glue stick.
We looked up the Irish Flag and we were relieved to see that it was a simple flag much like The Netherlands, as opposed to some of the more challenging flags that we've done like Mexico. I got the supplies ready and we got started. 


Aiden always gets the scissors.
Eliana always gets the glue.
And it's done. 
With the flag complete, we are ready to do our next project. My parent's just went to Ireland a couple of months ago and brought back a book of Irish activities to do with the kids. I also asked a friend who used to live there for some ideas and she gave me some good ones, too. I'm pretty excited and I'm thinking this is going to be a fun adventure! I hope you'll check back Thursday to see what we are up to.


Coming Soon: Irish stamp for our passports, Irish Crafts, and there's a giveaway in the works! 


* Hey! Check it out, I added a "Detours and Shortcuts" option to the menu (Atlas). This way if you want to look for a specific post, like the food from Pakistan, or the flag from Mexico, you can find it quickly, rather than having to scroll the archives (Places We've been). 


Thursday, November 17, 2011

Seven: An Egyptian Party

As I assume most children do, Aiden has been planning his birthday party since his last one. First he was going to do a zombie themed party, then a space themed party, then he decided on an Egyptian themed party. Last year his kindergarten teacher was inspired by our cultural studies, so she decided to do a similar exploration at school with the K-1 class. They chose to learn about Ancient Egypt. Ever since then, Aiden has been over the top obsessed with Egyptian anything. I am certainly not complaining, each time he pulls out some random Egyptian tid bit (Did you know that the first ever shower was in Ancient Egypt???) my heart is warmed and filled with pride. 


So as he and I discussed the Egyptian party and what we would do for his party, we talked about a pyramid cake. I. committed. to. making. a. pyramid. cake. Now for some of you this seems like no big deal, but for me, it was huge. I am completely comfortable in the kitchen and I enjoy cooking and baking, but cooking and baking and sculpting a cake pyramid are two (or three?) very different things. For some reason my artsy crafty side wasn't connecting with my cooking baking side. In all of my plans and thoughts about this cake, I imagined starting early and allowing time to redo the cake if it failed. Then, it hit me, and it hit me hard... I am no Ace of Cakes and I don't have time to make a second pyramid cake if I do a terrible job on the first (and what says that the second would be any better?), it's not like you can make a cake six weeks ahead of time. It was at this point I knew that Aiden and I would have to talk. I was worried that he would be totally bummed but as we talked about alternatives, he said that he wanted Basbousa. 


For those of you who know me, I will pause here while you regroup from trying to imagine me starting early on anything... yet another side of me that was not connecting with the artsy, crafty, cooking, baking me. Procrastinating me. OK, let's move on.... 


Basbousa is a dessert that is made in Egypt (originating in The Middle East). I had made it for the celebration at his school last year and it was a hit. It is nothing like birthday cake, it's sort of like corn bread but much sweeter. I worried that some guests would be disappointed (who doesn't expect birthday cake at a birthday party?) but in the end we decided that since it is Aiden's party and that's what he wants, that is what we'll have (and it is WAY easier than a pyramid cake!) 


Basbousa
We used plastic Egyptian figurines as decorations on the table and Aiden had even suggested that I read some Egyptian books to his friends. Since I felt like I was already stealing the party thunder by not making a birthday cake, I told him that his friends would rather play than listen to me read, but I put the books out on a side table in case anyone wanted to look at them. 


We had a great time and Aiden got some great gifts. When it was time to say goodbye to his friends we gave each of them a necklace that we made. We used Sculpey (you knew I couldn't stay away from it for *that* long, didn't you?) and made scarab beetle beads. 


After the party was over, I looked at my boy who had yet to actually have his seventh birthday and decided that as much as I've enjoyed the last seven, I can't wait for the next seven ... I just hope that they go slower. Oh, and before you start feeling too badly for him, he got a birthday cake on his official birthday... just not a pyramid. 


* The three books that we had out for guests to look at (and you might want to check out with your kids) are Magic Treehouse #3: Mummies In The Morning by Mary Pope Osborne, Egyptians by Stephanie Turnbull, and Who Was King Tut? by Roberta Edwards.


(See other adventures with Sculpey here, here, and here)


Monday, November 14, 2011

Can I Stamp Your Passport?

When I first was faced with the concept of making passports I was so excited (read all about that here) that I didn't give much thought to the making of the stamps. I have never made potato stamps before, well, never isn't entirely true, I think I made them once when I was in elementary school but my memory of it has been erased and filled with other memories. 

My littles and I decided that we should make stamps for the places we had already been, because if we were planning to make them for the upcoming destinations then it really wouldn't be entirely representative of where we had been to leave out the six countries that we've already "visited". We made a plan of what would go on each stamp and sat down with our supplies. 


Before committing 100% to potatoes, I contemplated other mediums. I really hate to waste good potatoes by cutting them up and putting ink on them only to throw them in the compost bucket minutes later. I thought about the styrofoam trays that our avocados used to come on, but  after several people including me complained, they switched those trays for compost-able ones. That change was a huge thing that I was very excited about, but I didn't hang on to any of the old styrofoam on the off chance that I might want to make stamps out of them someday. So, potatoes it is. 


My littles sat so patiently with me while I carved out potato #1. They waited patiently as I discovered that even a paring knife was really just too big and went in search of a teeny tiny screwdriver (which works perfectly by the way). They even waited patiently when I decided to add lines to each page of the passports so that we can get two stamps per page instead of one. As we were about to stamp the first page with our very first potato stamp, I was hit with the idea that maybe I should do a test run, I mean it looks great without the ink.


It looks beautiful with the ink but I just wanted to test it out first, to be sure that it was going to look perfect.

Doesn't it look GREA..... whoa! Wait... what? It's backwards!?!?!?
You can't even imagine how incredibly stupid I felt at this moment. Of course it's backwards. I felt slightly better when I told my friend that I had done that and she said that she would have done the same thing. Since I now knew that at least two otherwise reasonably smart women would make this mistake, I decided to share with you, in the hopes of saving you the same frustration if you choose to make potato stamps. Not that I think you wouldn't know that already, I'm just saying, the excitement of potato stamping can get pretty overwhelming and make you do some silly things (obviously).  

At this point, my patient littles had completely lost interest in the potato carving and ran off to play. After carving the second stamp for Greece, this time the right way, I called them back to stamp their own passports.


By myself, I continued on making potato stamps and stamping the passports for all of us. After completing the fourth stamp I realized that it was dinner time and I still have way too much to do in preparation for my oldest little's birthday party, so the last two will have to wait for another day. 
Greece 2011 with an Olive Branch, Morocco 2011 with a Cobra (Aiden had that idea), The Netherlands (NL)  2011 with a windmill, and Australia (AU) 2011 with a kangaroo (cliche I know, but I'm working with a 4 and 6 six year old here).
I hope that you have understood that the moral of this story is, even when you think and think and think about a project there could still be an aspect that you forget about. Always do a test run and if things come out wrong, clean up the mess and start over. 

Coming Soon: See how we celebrated Aiden's birthday. Also, the globe has been spun and we are gearing up for our next destination. 


Thursday, November 10, 2011

Passports Please

I realized recently that my sister in law, Katie, is brilliant. While discussing some ideas with her about my blog and our home-based adventures she asked, “Did you make passports that you are stamping with potato stamps?”

*GASP * What? This is a fantastic idea, why had I not thought of this? I immediately bowed down to her, but she lives in a different country, so she didn’t get to bask in the glory of the bow. Really, I did the bow. Really.

After I brushed myself off from bowing down, I ran to my craft bin (ok, it's not so much a bin as it is a pile of stuff, but bin sounds better). What can I use to make passports? Should I make the covers fun and quirky using scrapbook paper? Or should I try to make them look like a real passports?

I was determined to use only what I already have, because after going to art school and being somewhat obsessed with fun craft supplies, there is absolutely no reason that I should be buying anything more from the craft store for a while (I'm sure I will soon anyway... but, shhh don't tell anyone). While I was digging, I found some old wallpaper (I'm not even sure where it came from or why I have it). The wallpaper is blue with some visual texture, then I discovered something marvelous and my search was over... the wallpaper was... wait for it... PRE... GLUED!!!!


I decided to use old popsicle boxes because Preston has a major addiction to popsicles and we could probably build a house out of all of the empty boxes. I pulled 4 of them straight out of the recycling bin (YAY for freebies). I gathered a few more supplies and got to it. 

First, I took sheets of 8.5 x 11 white paper and cut them in half. 

(She insisted on being in the picture.)
Then I folded the cut pieces in half.


After I folded the paper, I cut the boxes down to the size that I needed them to be (which was the size of my folded paper). 


With all of the paper cut and folded and all of the boxes cut to size. It was time to pullout the wallpaper. I filled a bowl with water and used a paper towel to wet the paper. Then I laid the cardboard pieces on the wet wallpaper and folded the sides around the edges (like wrapping a gift) leaving a small gap in the middle for the pages and foldability. 


After they were all glued, they were still quite wet, so I had to leave them to dry for a bit. I folded them so they would dry in the book shape that they will be and piled some books on top of them for weight. 


After the wallpaper had dried on my popsicle boxes, I glued the back pages on (for this I used craft glue and then smoothed it to a thin layer with a popsicle stick, so the paper wouldn't get ridges from the glue).


The next step was a little more fun, the personal pages. I typed up our information pages and added photos, printed them, cut them, and glued them to the inside of the cover (using the same method as I used for the back page).


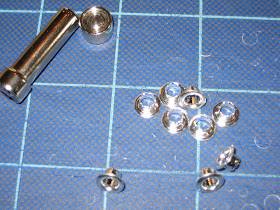
While waiting for the glue to dry, I started the next step. I had decided to punch holes and use grommets to attach the pages.


After the pages were all in and the grommets were attached, I decorated the covers with a paint pen. 


There were a lot of steps, as you just read, to getting the passports made, but I am quite pleased with how they came out and it will be a lot of fun making the potato stamps for each country. 


Now I'm off to prepare a birthday party for my oldest little, my work is never done. 


Coming Soon: potato stamp adventures, spinning the globe again and moving on to another country, and who knows, maybe a trip to a craft store for more miscellaneous supplies. 


Monday, November 7, 2011

Dia de los Muertos

Last Wednesday was Dia de los Muertos. Dia de los Muertos is a Mexican holiday that has grown in worldwide popularity. We learned about it when we studied Mexico a little while back (read about our Mexican adventures here, here, here, here, here and here). On Wednesday I wrote a post called "Dia de los PINTEREST???" that included a snippet of how we celebrated The Day Of The Dead. Now, as promised, I bring to you, our Dia de los Muertos. 


Before I jump to the photos of what we did, I want to quickly fill you in, in case you have not actually ever celebrated The Day of the Dead, or learned anything about it. In Mexico, Dia de los Muertos (translates to The Day of the Dead) is actually spread over several days, culminating on November 2nd. This is a day when they set up altars honoring friends and family that have died. It is usually done in a way that celebrates the persons life. This is a happy occasion, this is not a day of mourning, but more of remembering who they were and celebrating their faults as well as their virtues. Also, offerings are made to deceased; these offerings are represented by their favorite food, a favorite hobby, you get the idea. If The Day Of The Dead is not something that you have heard much about before now, I highly suggest that you do a little research and consider celebrating next year. 


To begin with, the day before The Day of the Dead, we made Papel Picados. These are decorations made from cutting tissue paper. After the paper is cut, it is hung on or around an altar. 


Seriously, can't you just feel the excitement?
Aiden took this picture of me
(he's getting pretty good at using the zoom button, so we don't have a photo of the whole room)


After the kids went to bed I decided to try another papel picado, but this time instead of folding and cutting I would use an X-acto knife. I was foolish to think it would be easy, but I was pleased with the final product, even if it was wrinkled tissue paper. I considered ironing it, but was worried I'd start a fire (I have crazy thoughts like that from time to time).
I used a picture of a skull and traced it with pencil, then cut the shapes out, modifying where necessary. 
The next day, (Dia de los Muertos) Eliana wanted to color, so she colored a picture of a sugar skull. 

You didn't really think that I'd make that really fabulous sandwich for Aiden and not make Eliana one did you?
After lunch, I started setting up our altar. We made some tissue paper flowers (el papel florea), pulled out some candles and found some offerings for our loved ones.


I don't know if it is customary to celebrate the life of your dog on Dia de los Muertos in Mexico, but we lost our beloved 13 year old pit bull in the spring and since she was a part of our family, we decided that we wanted her on our altar. 


Sierra
November 6, 1997 - June 7, 2011
We hung her collar over her photo and made offerings of dog treats. Eliana drew a picture of Sierra (the black part is her tail. She didn't have a black tail, but we don't question an artist's creation around here).


Next up came grandparents. This is where it got a little harder. We had our memories to go on to figure out what kinds of things should be included here, but some of our memories are very old and the cobwebs make them blurry. 


I remembered that my grandmother would come visit us in Maine during apple picking season and she loved cortland apples. Every year when we pick apples, I make sure to get some cortland apples, because they remind me of her and that makes me smile. I offered a bowl of cortlands to her on this day.  


Honored here:
Sylvia Irene Cole
October 31, 1932- August 11, 1997
Stanley Alfred Cole
April 23, 1926- August 26, 2000
 
My other grandmother was an educator, so it seemed appropriate to put a book near her picture, I even had one that used to be hers. 


Lillian Elaine DeWolfe
June 24, 1930 - January 15, 2005
For my great grandmother, one of her linens.
M.Elaine DeWolfe
June 11, 1903 - June 1, 1998
We also celebrated the lives of Preston's grandparents. His grandfather liked airplanes and as a hobby, he built r/c planes, so we used one of Aiden's matchbox planes near his picture. 
June Elizabeth Brown
May 14, 1925 - September 20, 1984
Stanley Edward Brown
April 5, 1922 - January 13, 2004
Then we ate. Rather than trying to cook a meal of the favorite foods of our departed (I don't think I could stomach dog treats), we opted for a Mexican meal, it seemed appropriate since we were celebrating a Mexican holiday. I made one of our old favorite standbys, Fajitas. The kids wanted to use the fancy glasses, so I put apple juice in margarita glasses.


I just *had* to include this photo of the avocado slices. They look so scrumptious!
The perfect final touch was reading to my children, a Utah Philips quote that I saw over on Soulemama's blog.
"Time is an enormous, long river, and I’m standing in it, just as you’re standing in it. My elders are the tributaries, and everything they thought and every struggle they went through and everything they gave their lives to, and every song they created, and every poem that they laid down flows down to me – and if I take the time to ask, and if I take the time to see, and if I take the time to reach out, I can build that bridge between my world and theirs. I can reach down into that river and take out what I need to get through this world."

I was somehow surprised to feel as connected to our departed as I did. I assumed that we would tell the kids about our grandparents and discuss, the tradition of Dia de los Muertos, but instead I had moments where I felt like our loved ones had joined us for the dinner. I even left the altar up for a few days after just because it kind of felt like saying goodbye again... only not nearly as sad. All in all it was a beautiful day of preparation and a wonderful night of reconnecting with those who have left this wonderful world in search of the next.


Don't forget to check back Thursday to see what we are up to this week.